Menu

Show posts

This section allows you to view all posts made by this member. Note that you can only see posts made in areas you currently have access to.

Show posts Menu

Topics - Johannes @ Robots in Architecture

#21
Tutorials / Example: Simple Drawing/Engraving
April 29, 2016, 04:01:53 PM
Simple Drawing/Engraving
Requirements: Rhinoceros 5, Grasshopper 0.9.0076, KUKA|prc V2

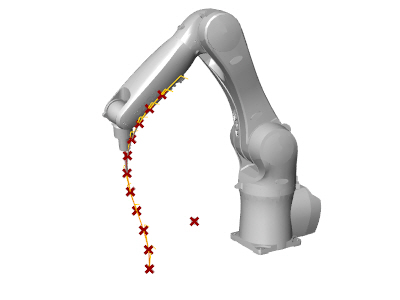
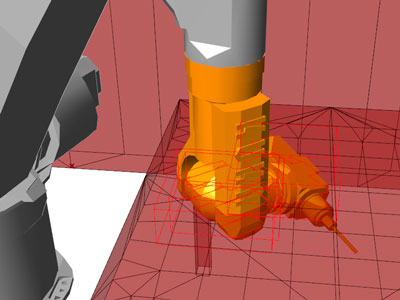
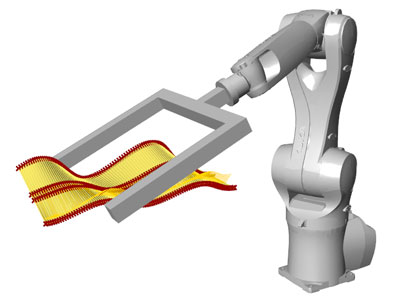
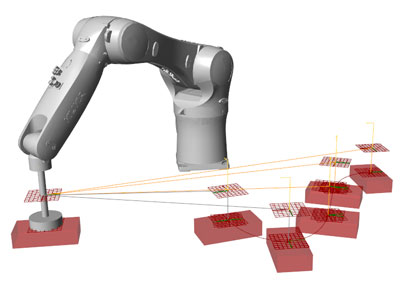
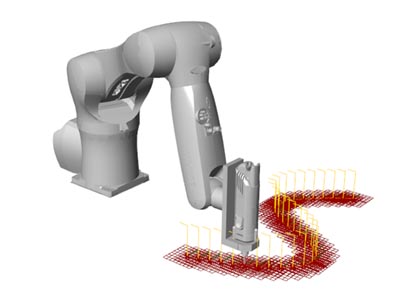
A simple example on how to have the tool follow a toolpath, e.g. for drawing or engraving.
#22
Tutorials / Example: Custom Tool Definition
April 29, 2016, 04:00:31 PM
Custom Tool Definition
Requirements: Rhinoceros 5, Grasshopper 0.9.0076, KUKA|prc V2

Example on how to define a Custom Tool. Place the geometry on the Rhino origin, as if it were the flange of the robot, i.e. with the Z-axis being normal to the flange. The XYZABC values define the offset from the flange. Note that KUKA|prc uses an adapted toolframe.
#23
Tutorials / Example: Robot Collision Checking
April 29, 2016, 03:57:44 PM
Robot Collision Checking
Requirements: Rhinoceros 5, Grasshopper 0.9.0076, KUKA|prc V2

When collision checking is enabled, KUKA|prc will check for collisions between axes, cell geometry and custom collision geometry. Note that it is very computationally intensive - smaller meshes (e.g. via ReduceMesh) greatly increase the speed.
Members can use the "Analysis" component to automatically optimize towards avoiding collisions.
#24
Hello All,

As there have been some questions, here is a possible workflow towards achieving a KUKA|prc simulation that is as accurate as possible.

...mount the tool on the spindle. Go to Start-Up/Calibrate/Tool/XYZ 4 Point
...remember the number of the tool!
...choose a point anywhere in the robot's workspace (e.g. sharp tip of another tool, wood if you want to be extra-careful) and move the tooltip there.
...press Calibrate, then move the robot away, change its orientation and move it to the same point from another direction.
...at the end the robot will ask you for the load data, either enter it or use the default values
...it should now show you the average error of your measurement (sharp tips go down to 0.1-0.2mm if you are good, regular cylindrical tools probably in the area of 0.5-0.6mm) and the XYZ values (i.e. the offset from the flange in each direction).

...to set the orientation of the spindle, go to Start/Up/Calibrate/Tool/ABC World.
...choose 5D
...align the tool vertically, i.e. facing downwards as accurately as possible (there are more accurate ways than ABC World, but it's the easiest)
...press calibrate and confirm the load data
...Write down the XYZABC values of your tool as well as it's tool number

...to define a local coordinate system, go to Start-Up/Calibrate/Base/3-Point
...set a number for the base
...for the tool, choose the number of the tool that is currently mounted
...move the tooltip to the origin of your local coordinate system (from any direction, only the tooltip counts)
...press calibrate, then move the tooltip to a point in the X direction of your local coordinate system (the further the more accurate)
...press calibrate, then move the tooltip on a point on the XY plane (in the case of a rectangular, extruded stockmodel that would be anywhere on the surface plane, but preferably not too close to the origin. It does not have to be a corner point).
...Write down the resulting XYZABC values of your base as well as it's number.

...to use the same base in KUKA|prc, go into the KUKA|prc settings
...in the section "Base Settings" choose the right base number and enter your XYZABC values.
...click apply to save

...to create a custom tool, first model (or import it from somewhere) the tool and mesh it.
...join it into a single mesh (important! multiple meshes will for some reason slow KUKA|prc to a crawl). Consider using the ReduceMesh command in order to improve performance.
...place it in a way that the tooltip is at Rhino's global origin and X+ is along the tool axis.
...now get KUKA|prc's Custom Tool component and connect the mesh to its input.
...double-click the component and enter the number of your tool, as well as its XYZABC values.
...see also here: http://forum.robotsinarchitecture.org/index.php/topic,5.0.html

...having the same base and tool numbers as well as XYZABC values ensures that the simulation will be as accurate as possible.


This workflow applies to the very first projects only, once you know your tools' XYZABC values you just have to remember the number under which they were saved. In the case of milling you can e.g. try to make a Excel formula (or Grasshopper definition) that calculates the XYZABC values based on the length of the tool. You can also use a fixed base that is e.g. clearly marked on the robot's table and place your material accordingly, instead of calibrating a new base for every object.

Note that achieving a 100% accurate simulation is never possible, as the KUKA robot's algorithms are not public domain.
All the steps above are also described in the KUKA System Software manual. It is included with your robot as a PDF on the DVD - if for some reason it isn't, it should be possible to call the KUKA hotline and have it sent to your eMail address.

Hope this helps!

Johannes @ Robots in Architecture
#25
Tutorials / Tutorials Updated
March 26, 2014, 12:11:11 AM
The tutorials have been updated to work with the most recent release of KUKA|prc and Grasshopper. Ideally update your KUKA|prc installation if you haven't done so already.
If you for any reason still need the old version of the tutorials, please contact johannes@robotsinarchitecture.org

Best,
Johannes
#26
Tutorials / Example: Extrusion Process
December 26, 2013, 04:53:12 PM
NOTE: This example uses an older version of KUKA|prc!


Title: Robotically Extruding Material along a NURBS CURVE
Level: Beginner
Description: Robot follows a NURBS curve tangentially as to extrude material.
Requirements: Rhinoceros 5, Grasshopper 0.9.0072, KUKA|prc

Refer to projects such as www.mataerial.com/#mataerial-in-action by Mataerial - but note that such processes are more complex than just the motion planning as shown in the Grasshopper example above. The ";KRL EXTRUDE START" command is just a placeholder, if e.g. the extruder is attached to the robot's digital output #33, you could use "$OUT[33]=TRUE" instead.

The example has been updated to use the most recent version of the KUKA|prc trial version!
#27
Tutorials / Example: Automatic Linear Axis Strategies
October 17, 2013, 11:35:22 PM
NOTE: This example uses an older version of KUKA|prc!


Title: Using different adaptive strategies for the robot's linear axis
Level: Advanced
Description: The new adaptive linear axis strategies allow finetuning of the robot's rail strategy, e.g. continuous readjustments or only partial readjustments when required.
Requirements: Rhinoceros 5, Grasshopper 0.9.0072, KUKA|prc

LINEAR AXIS FUNCTIONALITY IS ONLY AVAILABLE IN PRC-MEMBER VERSIONS (20131017 or newer) ONLY
#28
Member Section / Important Information for Members
September 19, 2013, 02:15:03 PM
In order to see the member section, you have to be tagged as a member. If you or your institution are members of the Association for Robots in Architecture, please register at the forum and send an eMail with your chosen username to johannes@robotsinarchitecture.org
We will then add you to the Member group!

Thank you!
#29
NOTE: This example uses an older version of KUKA|prc!


Title: Parametrically dividing a NURBS curve into linear and circular movement commands
Level: Advanced
Description: Divide a NURBS curve into linear and circular movements, reducing file size and improving interpolation compared to a long sequence of just linear movements.
Requirements: Rhinoceros 5, Grasshopper 0.9.0072, KUKA|prc
#30
Tutorials / Example: Spline and Circular Movements
September 19, 2013, 01:23:18 PM
NOTE: This example uses an older version of KUKA|prc!


Title: Using Spline and Circular Movements
Level: Basic (spline), Advanced (circular)
Description: This example shows you how to use the spline command and one way to approximate a curve with arcs (e.g. for older robots that do not support spline movements)
Requirements: Rhinoceros 5, Grasshopper 0.9.0072, KUKA|prc
#31
Tutorials / Tutorial: Basic KUKA|prc & Grasshopper
August 27, 2013, 08:05:09 PM
NOTE: This example uses an older version of KUKA|prc!


Title: Basic KUKA|prc & Grasshopper
Level: Basic
Description: Introduction to KUKA|prc and Grasshopper
Requirements: Rhinoceros 5, Grasshopper 0.9.0072, KUKA|prc

Remark: The tutorial was initially made as workshop support material. It should also be useful to get started with KUKA|prc in general. For Grasshopper tutorials and a very supportive forum, see also www.grasshopper3d.com
#32
Tutorials / Example: Custom Robot
August 27, 2013, 07:45:21 PM
NOTE: This example uses an older version of KUKA|prc!


Title: Custom Robot
Level: Basic
Description: Implementing a custom robot model into KUKA|prc
Requirements: Rhinoceros 5, Grasshopper 0.9.0072, KUKA|prc
#33
Tutorials / Example: Collision Checking
August 27, 2013, 07:42:18 PM
NOTE: This example uses an older version of KUKA|prc!


Title: Checking for Collisions
Level: Basic
Description: Checking for collisions between the robot and collision objects
Requirements: Rhinoceros 5, Grasshopper 0.9.0056, KUKA|prc
#34
Tutorials / Example: Custom Tool
August 27, 2013, 07:29:09 PM
NOTE: This example uses an older version of KUKA|prc!


Title: Using a Custom Tool Model
Level: Basic
Description: Integrating a custom tool model into KUKA|prc
Requirements: Rhinoceros 5, Grasshopper 0.9.0056, KUKA|prc
#35
Tutorials / Example: Hotwire Cutting
August 27, 2013, 07:11:52 PM
NOTE: This example uses an older version of KUKA|prc!


Title: Hotwire Cutting
Level: Intermediate
Description: Hotwire cutting example
Requirements: Rhinoceros 5, Grasshopper 0.9.0072, KUKA|prc
#36
Tutorials / Example: Pick and Place
August 27, 2013, 07:09:10 PM
NOTE: This example uses an older version of KUKA|prc!


Title: Pick and Place
Level: Intermediate
Description: Program the robot to arrange bricks
Requirements: Rhinoceros 5, Grasshopper 0.9.0072, KUKA|prc
#37
Tutorials / Example: Simple Toolpath
August 27, 2013, 07:05:56 PM
NOTE: This example uses an older version of KUKA|prc!


Title: Simple Toolpath
Level: Basic
Description: Program the robot to trace a line drawn in Rhino
Requirements: Rhinoceros 5, Grasshopper 0.9.0072, KUKA|prc